Update – 10/03/2024: Ollama is a much easier way to get setup locally with a variety of LLMs. There is a section below called FlowiseAI, which is still a great tool for getting workflows done and may work with Ollama, but I need to test it out before making any recommendations. So if you are interested in a much easier approach to installing a local AI chatbot, please read more here.
This article strays from our goal of giving our readers a high-level overview of technology. But we have heard a lot of complaints about the cost of operating any of the cloud services around AI (like Azure’s OpenAI Service or Pinecone Vector Databases) and the API usage cost. Especially when trying to test things that are probably not going to work the first time, the cost of learning is high.
I came across the same issue when I started out in this space and I have two methods to help you get started with your own local AI. Please note that you will need a decent computer to be doing this, otherwise you will be waiting for a while to get responses from your chatbot.
Both of the methods that I will be providing require no coding on your part. You will need to use command line for some of the installs but you can just copy and paste from what I have provided in this post.
Koboldcpp
This is the easiest way to get a local LLM on your machine for you to interface with, but it is limited to Windows OS, unless you are willing to compile the source code on mac OS. The setup should not take very long, but the processing time of the LLM initially and when using your chatbot will depend on your machine’s specifications (how much RAM you have, CPU cores, if you are offloading processing to the GPU, etc).
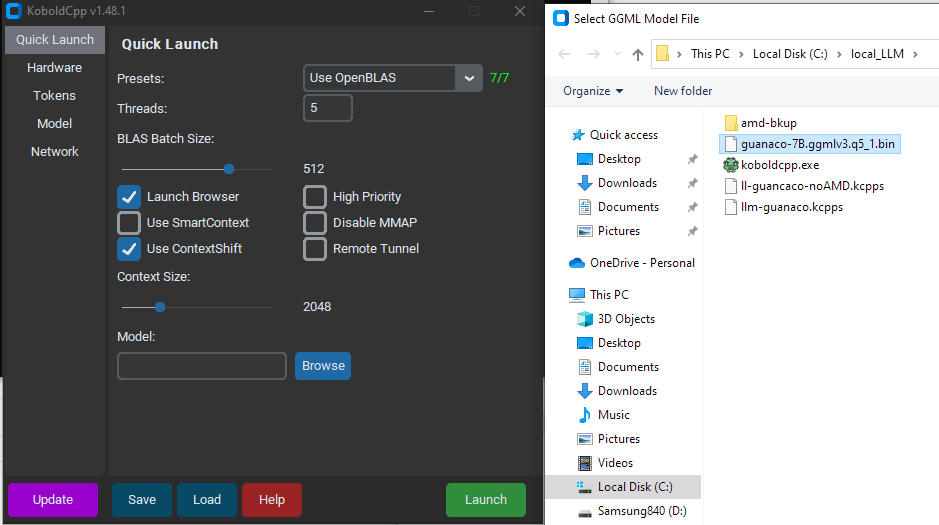
Step 01 – Koboldcpp Download
- Create a directory on your machine where you will store the application and the LLM bin file.
- Download koboldcpp
- Place this download in the directory you created
Step 02 – Download the LLM you want to test
- 7 billion parameter models
- 13 billion parameter models
- Place this model into the same directory you created for the koboldcpp app
- Launch the koboldcpp.exe
- Configure koboldcpp
- Select which LLM you want to use
- Select threads (recommend to use half of what your machine has)
- Launch
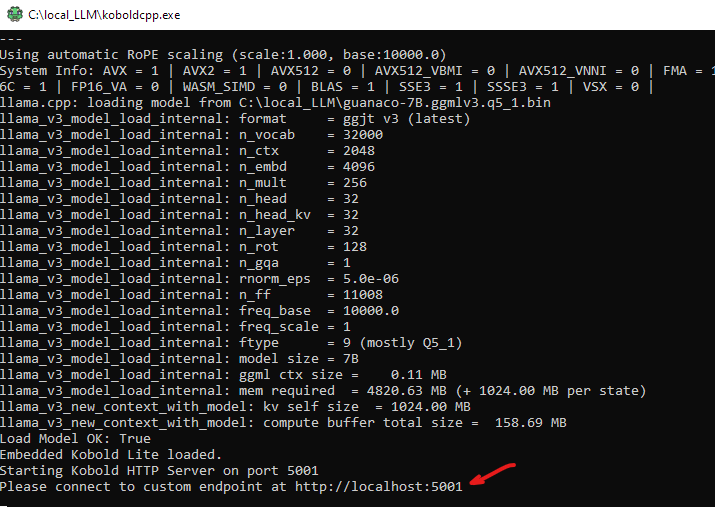
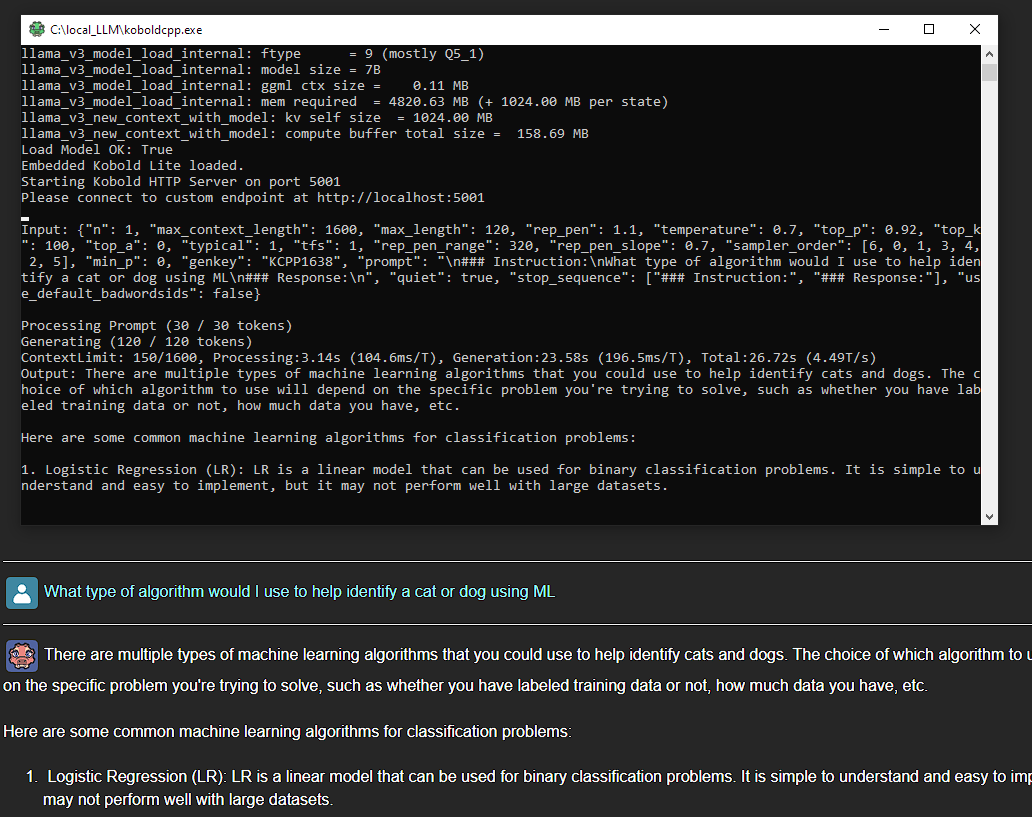
That is koboldCpp in action. Now we are going to go into a more customized solution that requires some git-fu and docker.
LocalAI
Here are the steps to setup your local machine to start with LocalAI.
Prerequisites
You will need to have the following installed on your machine to proceed:
Step 01 – Download required apps
Download and install Docker, there is not much that you need to do here. While that is installing you can download LocalAI. If you have git already installed you can use the command below to get the LocalAI code.
git clone https://github.com/mudler/LocalAI.git
Step 02 – Download the LLM you want to test
- 7 billion parameter models
- 13 billion parameter models
- Place this models into the model directory within the LocalAI directory
There are a lot of options for you to test out. One of the most popular ones is GPT4All and Llama, which can be found here:
Once you have downloaded the models that you want to use you can place them in the models directory within the LocalAI directory. Feel free to include more than one, when you begin to use the API you will have the ability to select which model you want to leverage for your project.
Step 03 – use LocalAI to generate a Docker image
Now that Docker is installed and you have the LocalAI code you can use the following command to create your own local instance. From within the directory that contains the LocalAI code run the following command.
docker-compose up -d --pull always
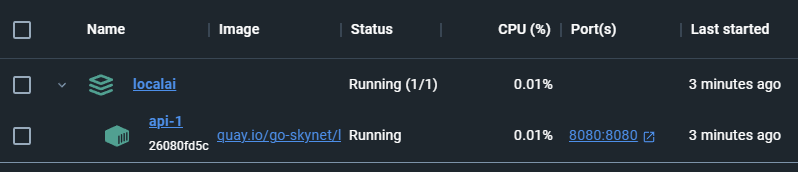
The first time you run this, you may want to go grab a bite to eat or take a walk. It is not going to be quick. Once the image is setup it should load a lot quicker in the future. Once docker is done loading you should see something like the image provided below. Open the image and you will see which ports are available for this instance. It should be 8080, but if you make some modifications and forget what port you assigned you can always check here.
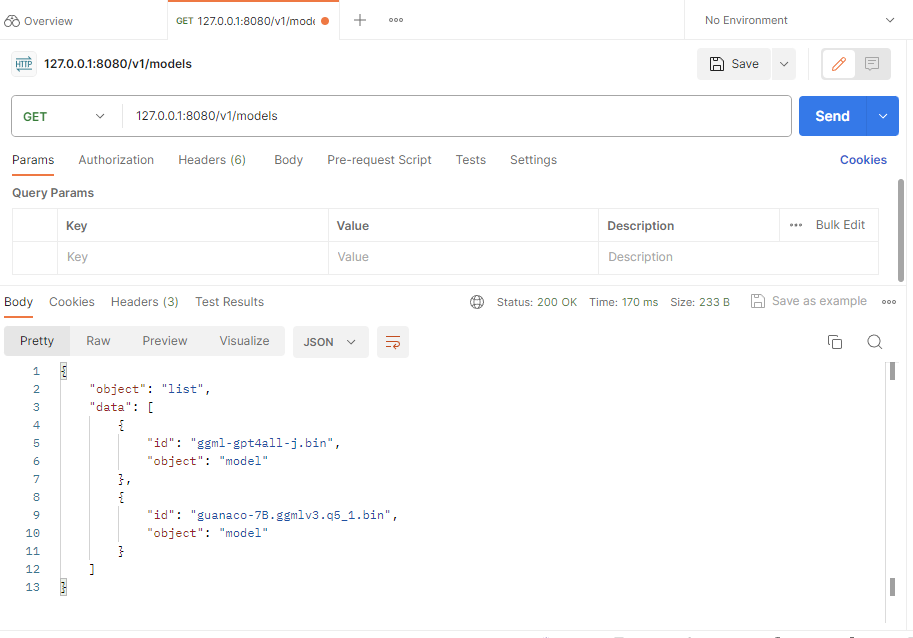
Step 04 – Verify using Postman
Launch the Postman app and use the ports identified in the docker image to GET a list of LLMs that are available.
This will provide you with a list of available LLMs as shown below.
Now you have a local instance with some LLMs loaded into it. But interfacing with it is not as simple as the koboldcpp examples above. Now that the Docker image and the LLMs are available we will need to interface with them. Normally this would require some coding on your part, which is why this next piece is so exciting.
Step 05 – Install and use Flowise
Flowise is downloaded using git and installed using node.
git clone https://github.com/FlowiseAI/Flowise.git
Once flowise is installed you can run the following from the flowise directory to spin it up.

Once flowise is running you will be given port 3000 (do not close the terminal). Using this port number we can go to localhost in our browser.
This will give us access to our flowise instance, which we are going to connect to our localAI docker image. Your chatflows will be shown on the homepage, where you can also access the Marketplaces or create a new chatflow.
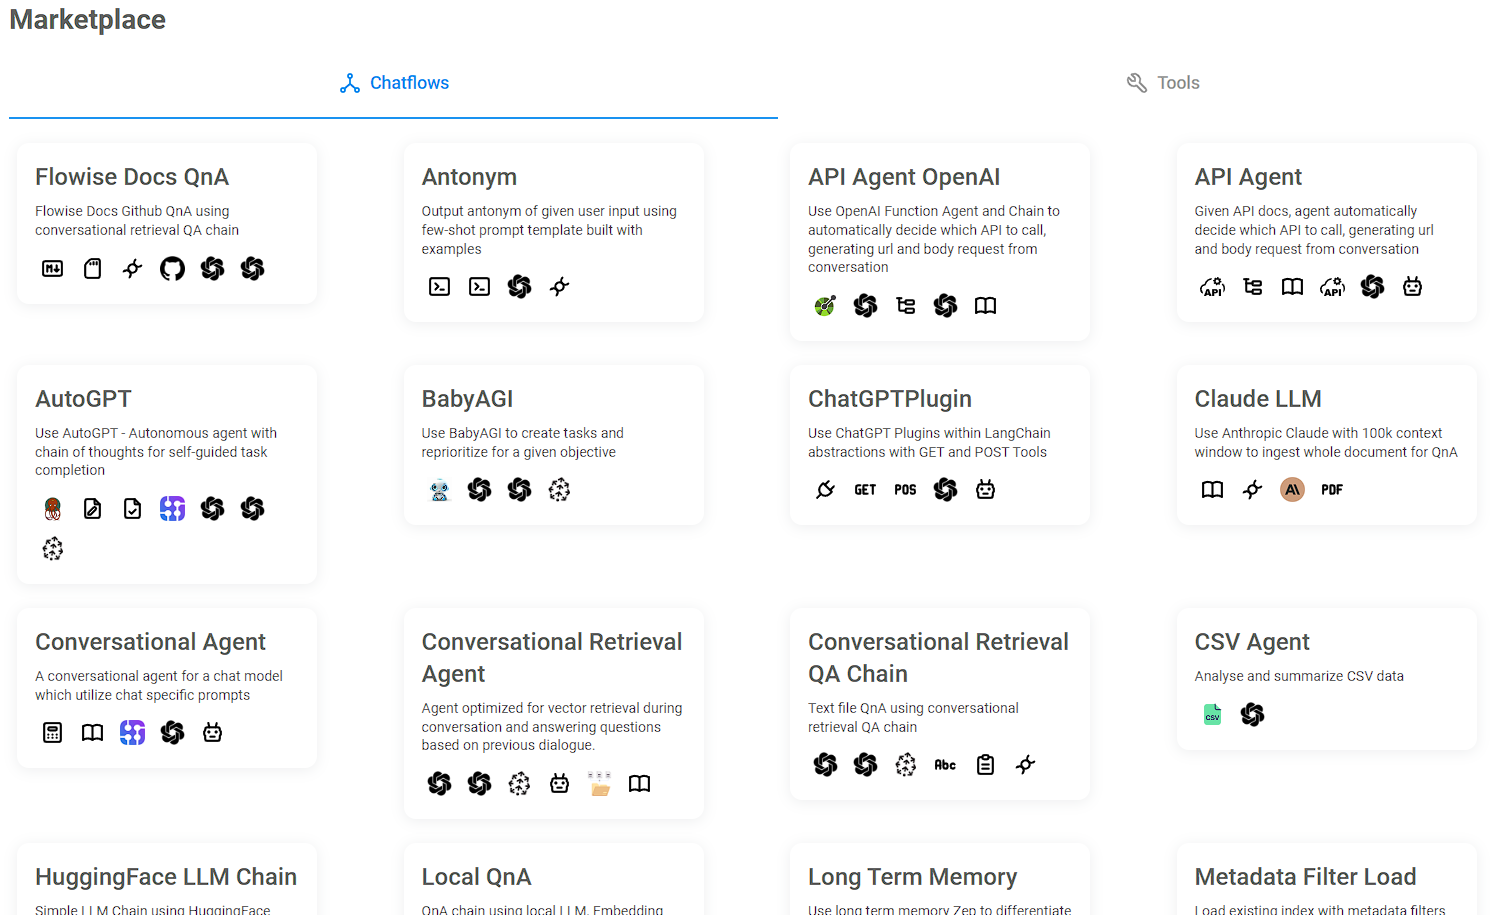
I highly recommend taking a quick peak at the Marketplaces because they have a lot of prebuilt chatflow templates that you can use. For example if you want to use a local LLM chatflow you can use one right away, or you can use something more complicated and swap out the LLM piece to a local LLM.

Below is a screenshot of the Marketplace, each card has the name and description. It also contains icons that will make more sense as you use them, the show what nodes are being used, like prompt, openAI, vector store, chains, etc.
Once you have chosen a template you will be shown the pieces that make it, at the top right you can click on “Use Template”, which now lets you use the template and configure it as you wish.

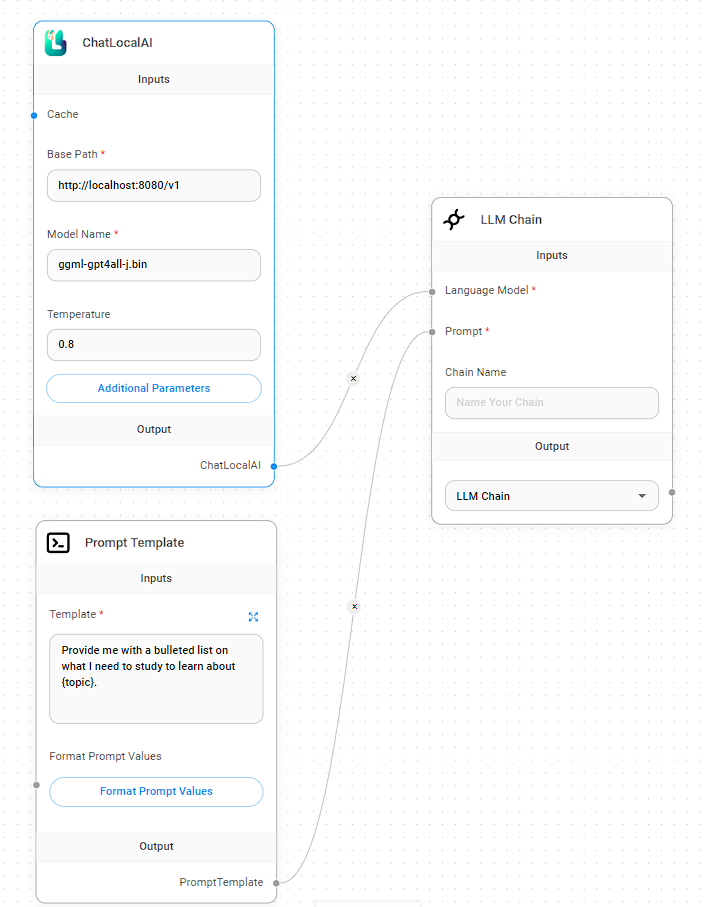
If you want to swap out one of the nodes with the ChatLocalAI you can go to the add node button and type in local in the search bar and drag over what you want to use.
In this example we have our LocalAI pointing to the docker image, and since we used postman and got the names of the Models we can select the one we want to use here. Temperature can be thought of as a method to increase or decrease how creative the response will be.
Low temperature would mean an exact answer without much creative language. Where as a higher temperature would increase the probability of an incorrect response while sounding better. Depending on what you are trying to do the temperature can make an impact.
This is the perfect use case for testing this out, ask the same question but change the temperature and see what has changed.
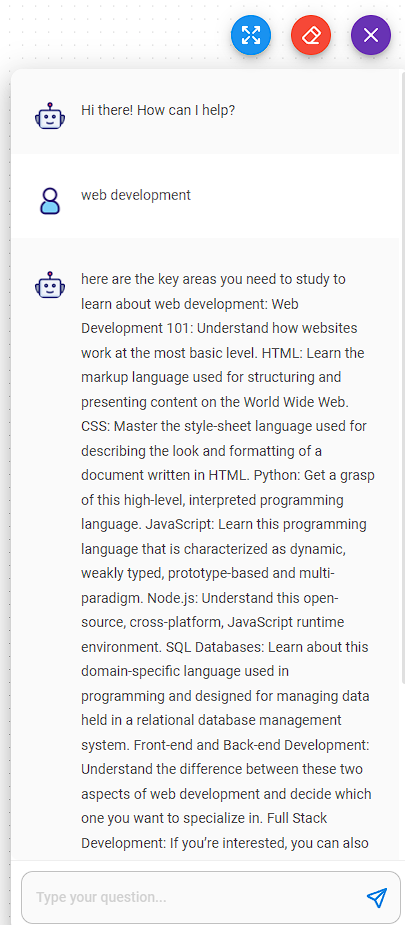
The prompt template in this example is narrowing down what we can type in the chat, so in this case we could just type in “web development” or “being a parent”. (yes I’m joking)
Finally you can use the chat bubble on the right or grab a code snippet and embed this into your own local dev site to see how it works. In the example below the response came through but it was not formatted the way I wanted it to be. But the content is not that bad. Some of it is not really helpful like “Web development 101: understand how websites work at the most basic level” is like saying “to learn about web development you should learn about web development”.
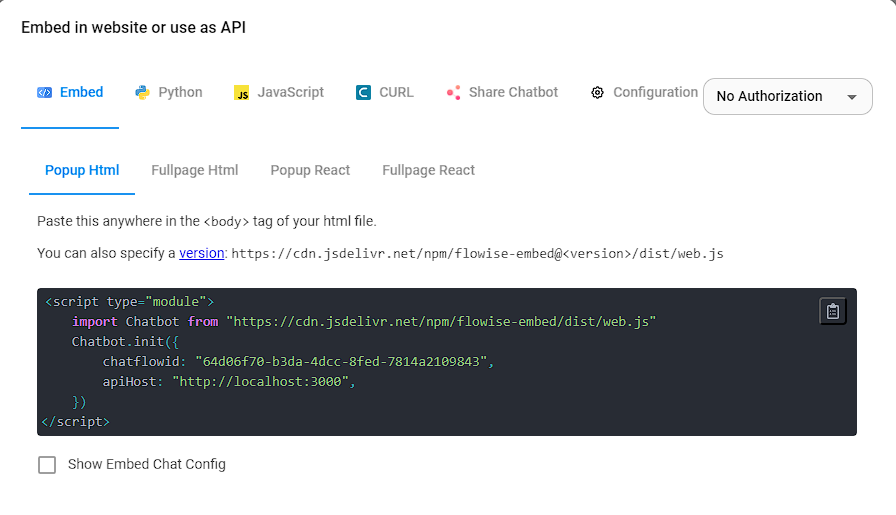
To embed a snippet of the chatbot you can use the code snippet button at the top of the page, which will open the modal you see below.
I hope you found this useful and as always I welcome your feedback.
Vatché
Tinker, Thinker, AI Builder. Writing helps me formulate my thoughts and opinions on various topics. This blog's focus is AI and emerging tech, but may stray from time to time into philosophy and ethics.
